Blog
Hardwood Floor Care Tips and Recommendations
  • Toss the Steam Mop

    Dec 04, 2013

    Toss_the_Mop

    If you go to the store, chances are there will be steam mops on the shelves advertising beautiful results for your hardwood floors. The reality is that steam mops are not intended for word floors; in fact, steam mops can ruin your hardwood floors over time and leave you with higher repair costs and unnecessary maintenance.

    Moisture is a wood floor's worst enemy. Moisture content in wood floors can be defined as the weight of water in wood. This weight is expressed as a percentage. Wood fibers in your floor are dimensionally stable when moisture is above the saturation point. The saturation point is around 30% moisture content. When the saturation point dips below that, you are likely to see your wood change dimensions and start to discolor, warp, or distort. (Note that the saturation point may vary depending on the type of wood of your floors.) 

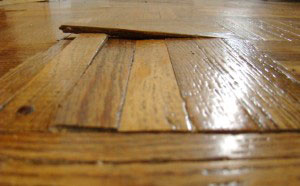
    Steam mops will give you a deep clean finish, but that is exactly why they are not ideal for wood floors. The deep penetration of steam into the wood surface to remove soils and contaminants will force unwanted water into your floors and increase the moisture percentage. Overtime, this can cause your floor boards to warp. (Picture above is of a warped floor board.)

    This does not mean that you can’t clean your floors. In fact, we advise that you use a recommended floor cleaner. To know if a floor cleaner is recommended for a hardwood floor and its finish, we suggest that you check with your contractor first. If you do not have a contractor, Basic Coatings® Squeaky Floor Care System will provide optimal results on both polyurethane and waterbased finishes. If you pair the recommended cleaner with a microfiber mop, you will see very satisfying results. Microfiber mops are great, because they are effective in removing dirt and dust without releasing particles into the air.

    For more information on Basic Coatings Squeaky Floor Care System, visit basiccoatings.com. For questions regarding Hardwood Floor Maintenance, contact an expert at Basic Coatings or call Customer Service at 1- 800-441-1934.

  • Snap, Crackle, Pop

    Oct 07, 2013

    popping-300x186

    Hardwood floors are a common flooring choice for homeowners, as they are incredibly strong and add a level of elegance to any household. However, snap, crackle and pop are not words you want to associate with your hardwood floors. Floors are typically attached to the floor joists below with nails. Over time, the wood and nails may loosen and cause popping noises while you walk on them. This can be an annoying issue that may devalue your hardwood floors. To fix this problem, you can strategically find the particular wood floor panel that is popping and directly attach it to the floor joist with new nails. Follow the simple steps below to stop the pop!

    What you will need:

    • A safe release masking tape
    • Deep-scanning stud finder with metal scanning mode
    • Power drill
    • 10-penny finish nail
    • Hammer

    First, locate the popping portion of the wood floor by slowly walking across it. Press a piece of masking tape to the floor to mark the popping spot.

    Next, scan the area surrounding the marked spot using a deep-scanning stud finder. Locate the floor joist that supports that particular wood panel. Depending on the construction of the home, the joist will either run parallel or perpendicular to the nearest wall.

    Next, locate the center of the popping wood panel that is directly above the found floor joist. Drill a hole that is smaller than a 10-penny finish nail into the panel’s center point with a power drill. This tiny hole will prevent you from splitting the panel in half.

    Now, place a 10-penny finish nail into the drilled hole. Strike the nail with a hammer to affix the wood panel to the lower floor joist. This process should take some strength since the floor joist is extremely dense. The nail’s head should be below the wood’s surface.

    Finally, squeeze wood-colored filler putty onto the nail’s head. Leave adequate time to allow the putty to dry.

    Make sure you walk around the repaired area to verify that the popping noise has abated and do not install more than one nail in the same floor panel area. Clustering nails together can cause splitting in the hardwood structure.

    Tip: If you do not have a deep-scanning stud finder, you can locate the floor joists by scanning the floor for top nails. They will be covered with putty and located every 16 to 20 inches along the floor’s surface and denote the location and orientation of the floor joist below.

    These tips are also recommended by Amy Rodriguez, a professional writer from the San Fransisco Bay Area News. Follow SFGate on Facebook!

  • Soft to the Touch . . . Isn’t a Good Description for a Floor

    Sep 13, 2013


    Can you scratch your floor finish with your fingernail? Is your floor finish tacky? Does your floor finish mark easily? It sounds like your floor finish never completely hardened. This issue almost always occurs because the jobsite was not dried with adequate ventilation. The oil-modified urethanes stay soft for a different reason than waterbased systems, but the root cause is not enough air movement.

    All oil-modified finishes contain slow-drying solvents. Also, they contain an anti-skinning agent to keep the product from forming a skin in the can. This works by forming a layer over the surface that prevents the air from reacting with the finish. This anti-skinning agent stops the cure! If there is no air movement, then the mineral spirits and anti-skinning agent cannot evaporate and allow the oxygen in the air to react with the finish. This is even worse under high-humidity conditions. It is not necessary to have a high wind over the floor, but you cannot have dead air.

    Another very common reason for soft surfaces is covering the floor too soon after coating. Covering with the wrong material will also cause issues for the drying process. If you trap the solvents, water, and anti-skinning agents under a cover, they will keep the film soft and prevent it from hardening.

    Cleaning the floor sooner than recommended and/or using a cleaner that is too strong or incorrect can also soften the floor and prevent it from hardening properly.

    To prevent floors that are soft to the touch, always find a way to ventilate the floor to properly remove water, solvents, and anti-skinning agents, so your finish will harden to its maximum capabilities. If the jobsite cannot be left open for any particular reason, then use low circulation fans to turn the air. Do not cover the floor for at least two weeks.

    Note: Do not tape paper to the floor, only tape paper to paper. The tape can cause peeling of finish, as most tape adhesives contain plasticizers, which are non-drying solvents. Pulling tape from a floor can rip the floor finish.

    If you’re looking to finish your hardwood floors in the upcoming weeks, don’t forget to take a look at our new product, EasyStreet™!

  • It’s Just “Knot” Right

    Aug 30, 2013

    knot-300x224

    Knots are a beautiful natural characteristic in wood floors; however, they can be troublesome. Knot peeling is a common issue with soft woods and can leave your floor looking poorly finished.

    If you have knots in your floors, it is likely because the knots did not have the pitch or sap “set” during the kiln dry process. Heat from windows or other sources draws the pitch to the surface pushing the finish off. Above is an extreme example of pitch bleeding back up through a knot.

    Don’t worry, this issue is preventable. Knots can be sealed with a waterbased sealer, such as Basic Coatings® Emulsion Pro™, or shellac to prevent bleeding. If the floor is properly sealed, you should not find any peeling knots. If you have sealed the floor, and you are still finding your finish pushed to the surface, we recommend you contact your floor installation company or contact Basic Coatings®.

    To repair a peeling knot, the peeling finish needs to be cleaned off the affected areas until you reach bare wood. You may need to scrape the wood if necessary. Touch up with either shellac or a waterbased sealer.

    Note: As with most spot repairs, after completion of the repair, it will be necessary to screen and coat over the whole floor to make the appearance of the coating uniform.

  • Staining Made Easy

    Aug 07, 2013

    staining guy

    Staining your hardwood floor can be a tricky and scary process. Stains are permanent, so it is essential that you are confident in your selection of stain color. There are many choices to be made when deciding on a hardwood floor stain, and you might find yourself overwhelmed. Here are a few tips to prevent stress and avoid staining difficulties.

    • Safety first: When staining a wood floor, make sure you protect your skin and eyes with the proper protection. We recommend wearing safety glasses and disposable rubber gloves.
    • Test strip: Test your stain color on a scrap piece of wood to ensure you like the color before you start staining your entire floor.
    • Blotches: To prevent blotches on wood, apply a thick coat of wood conditioner before you stain. The conditioner needs 15 minutes to dry before you apply your stain. It is not necessary to sand the floor after the conditioner dries.
    • Oil-based stains: Stir stain thoroughly before applying. This will prevent the dyes and pigments of the stain from settling on the bottom of the can and ensure an even-looking stain. If you choose to use an oil-based stain, make sure the room is well ventilated.
    • No fumes: If you do not want to deal with the fumes that come along with an oil based stain, try using a waterbased stain. Waterbased stains come in a large variety of colors and can be applied the same way as oil-based stains. Basic Coatings® has a large variety of waterbased products for your needs!
    • How to apply: Apply stain with a brush or a rag, depending on your preference. If you choose to use a brush, work both with the grain and against it. Apply a nice, even and thick coat of stain on the wood. For a lighter tone, make sure you wipe the stain off immediately. For a darker stain, let the stain sit for five to ten minutes before wiping off. Be sure to wipe off the excess stain going in the direction of the grain to guarantee the stain gets into the wood opposed to settling on top.
    • Water and oil do not mix: Do not mix a waterbased stain and an oil-based stain. If you want to mix stains to create your own customized color, make sure that the stains are made by the same manufacturer and are both either waterbased or oil-based. Measure the amounts of each stain used and write it down so you can duplicate the mix if necessary.

  • Don’t Slip Into a Danger Zone!

    Jul 29, 2013

    untitled

    Accident prevention is always something on our minds and it is important that cleaning professionals and flooring installation companies take added measures to ensure floors are slip-resistant. Sometimes it may be hard to understand why a floor is slippery. Here is a list of reasons why floors may seem slippery following a floor refinish.

    1.) Not cleaned properly: Often times the floor that is being refinished is not cleaned the correct way or often enough. Many times, accidents can be prevented with proper cleaning. Dust accumulations can make a floor seem slippery. Pull out those mops and wipe the dust away!

    2.) The wrong chemical was used: When looking to buy a floor refinisher, make sure you check the label to see if it is “slip-resistant.” If you are worried about having a slick floor, do not invest your money on a product that is not slip-resistant. These products are usually higher quality so they are priced higher; however, it is worth the price when you are not spending your money at the doctor’s office!

    3.) Too few or too less- If there are not enough coats of refinisher on the floor, then your result may be a slippery floor. Same goes for too many coats. We recommend you apply three to four coats of floor finish and then test for slip resistance. Apply another coat if necessary.

    4.) An oily mop: An oily or over-treated dust mop can cause a floor to be slippery. We recommend you machine scrub the floor, and then go over it with a non-oil dust mop.

    5.) Dirty tools: Make sure when you are refinishing any floor, that you thoroughly clean all your tools and cleaning supplies. Contaminants may contain oil or substances that will make your floor a danger zone.

    We care about your safety! Use these helpful hints and tips for your future projects to prevent an accident! Basic Coatings can help you with any questions you might have regarding floor care. Contact us using the web form or by calling Customer Service at 800-441-1934.

  • "Is It Dry Yet?"

    Jul 22, 2013

    gallery-1512149908-gettyimages-75403973

    If you want to ensure a long lasting finish on your hardwood floors, it is important that you allow the appropriate amount of drying time. While waterbased floor coatings are known for their fast drying times in comparison to oil-based finishes, there are still a number of factors that influence drying times for optimal results, including:

    • Amount of air movement and circulation over the drying surface
    • Film thickness
    • Relative humidity
    • Temperature

    Amount of Air Circulation
    Air circulation is very important when it comes to drying  floor finishes. Without it, the solvent and water evaporating from the finish can quickly saturate a small layer of air above the finish, causing  the rate of evaporation to slow down significantly. For example, if your floor is in an enclosed area, the amount of time it takes for the finish to dry will be much longer than a floor in a room with proper air circulation. To ensure the right amount of air circulation, you can open windows, doors or install a fan to keep the air moving. Always wait until the finish has “set up” and is tack-free before introducing air movement to prevent dust accumulation or a ripple in the finish. This will normally take 30 minutes to an hour.

    Film Thickness
    Many are not aware, but floor finishes dry from the top down. Water and solvents must migrate through the wet film to evaporate. This will cause the curing process to become slower as film thickness increases. This simply means that thicker films will take longer to dry, stay softer longer and potentially damage your newly finished floors. Make sure that the previous layer of coating is fully dried before you apply your second coat.

    Relative Humidity
    When there is more humidity in the air, there is more moisture in the air. This can dramatically slow down the drying process for your floors. If it just so happens to be humid on the day you are finishing your floors, try to increase the airflow with a fan.

    Temperature
    The last factor that can impact drying time is temperature. There are two ways that temperature can influence drying rate. 1.) Temperature increases the air’s capacity to carry vapor. This can increase the drying rate, but only if the air is circulating and moving. 2.) The cooler the temperature, the longer the drying time. When the temperature is cooler, it slows the curing rate. Your result will be a slower drying time and a softer floor.

    Waiting for your floor to finish drying can be a long process, but if you want the best results, be patient! Your beautiful floor finish will be finished drying before you know it. We recommend Basic Coating’s® StreetShoe® NXT for a fast curing finish.

X